PCR Primer Design Guidelines
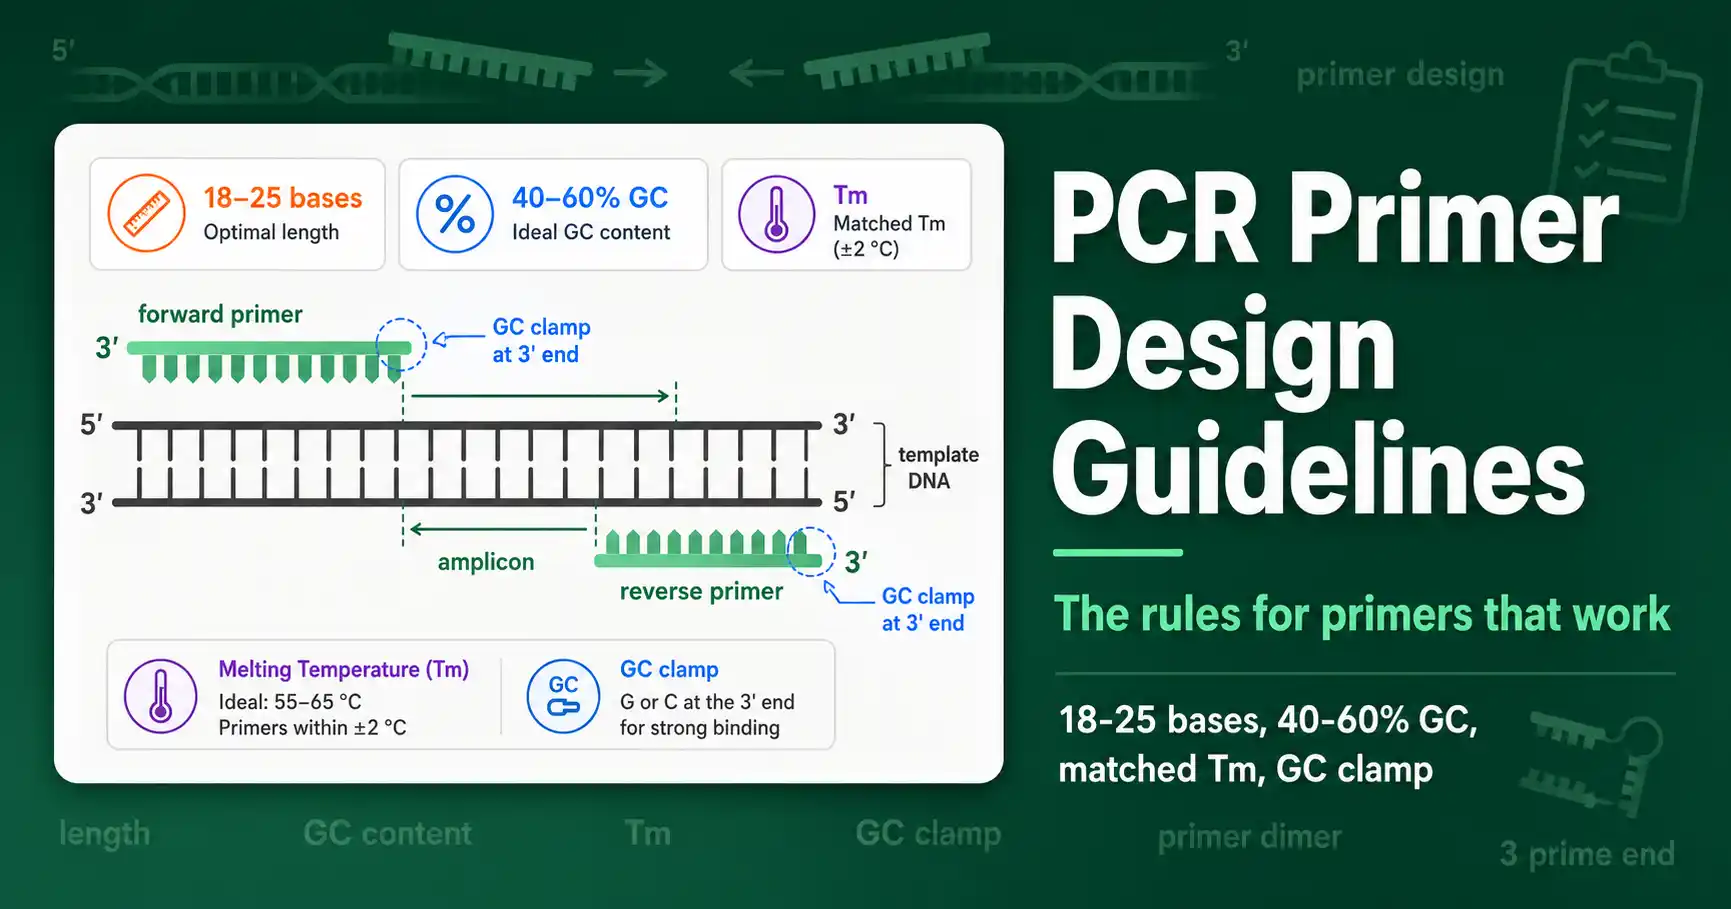
Good PCR primers follow a short set of rules: 18 to 25 bases long, 40 to 60 percent GC content, melting temperatures within a few degrees of each other, a G or C near the 3' end, and no tendency to fold up or stick to themselves. Primers that meet these guidelines amplify their target cleanly; primers that break them cause weak bands, no product, or nonspecific noise.
This guide collects the rules that matter and explains why each one exists. It covers length, GC content, melting temperature, the 3' end and the GC clamp, secondary structures, specificity, and 5' tails, and it ends with a checklist you can run on any primer. It builds directly on the properties covered in our guide on GC content and melting temperature.
Primer Length
Aim for primers 18 to 25 bases long, with 18 to 22 being a common sweet spot. Length balances two competing needs, and both extremes cause problems.
A primer must be long enough to be specific. With only the four bases, a sequence of about 16 or more bases is statistically unique even in a large genome, so a primer of 18 or more bases binds one place rather than scattering across many. But a primer can also be too long. Longer primers have higher melting temperatures, anneal more slowly, and cost more to synthesize without adding specificity once they are already unique. So the 18-to-25 window gives enough length for a single binding site while keeping the melting temperature and kinetics in a workable range. This range is the consensus across primer-design guides, which converge on roughly 18 to 25 bases for routine PCR.
GC Content
Design primers with a GC content of 40 to 60 percent. This range, covered in depth in the melting-temperature guide, keeps binding strong but controlled.
The reasoning connects directly to stability. GC content sets the melting temperature, so a primer in the 40-to-60-percent band lands at a workable Tm without further effort. Below 40 percent, the primer binds weakly and has a low Tm, risking poor amplification. Above 60 percent, it binds too tightly and becomes prone to secondary structures and nonspecific binding. Keeping GC in the target band is the single easiest way to get the melting temperature right, because the two move together.
Melting Temperature
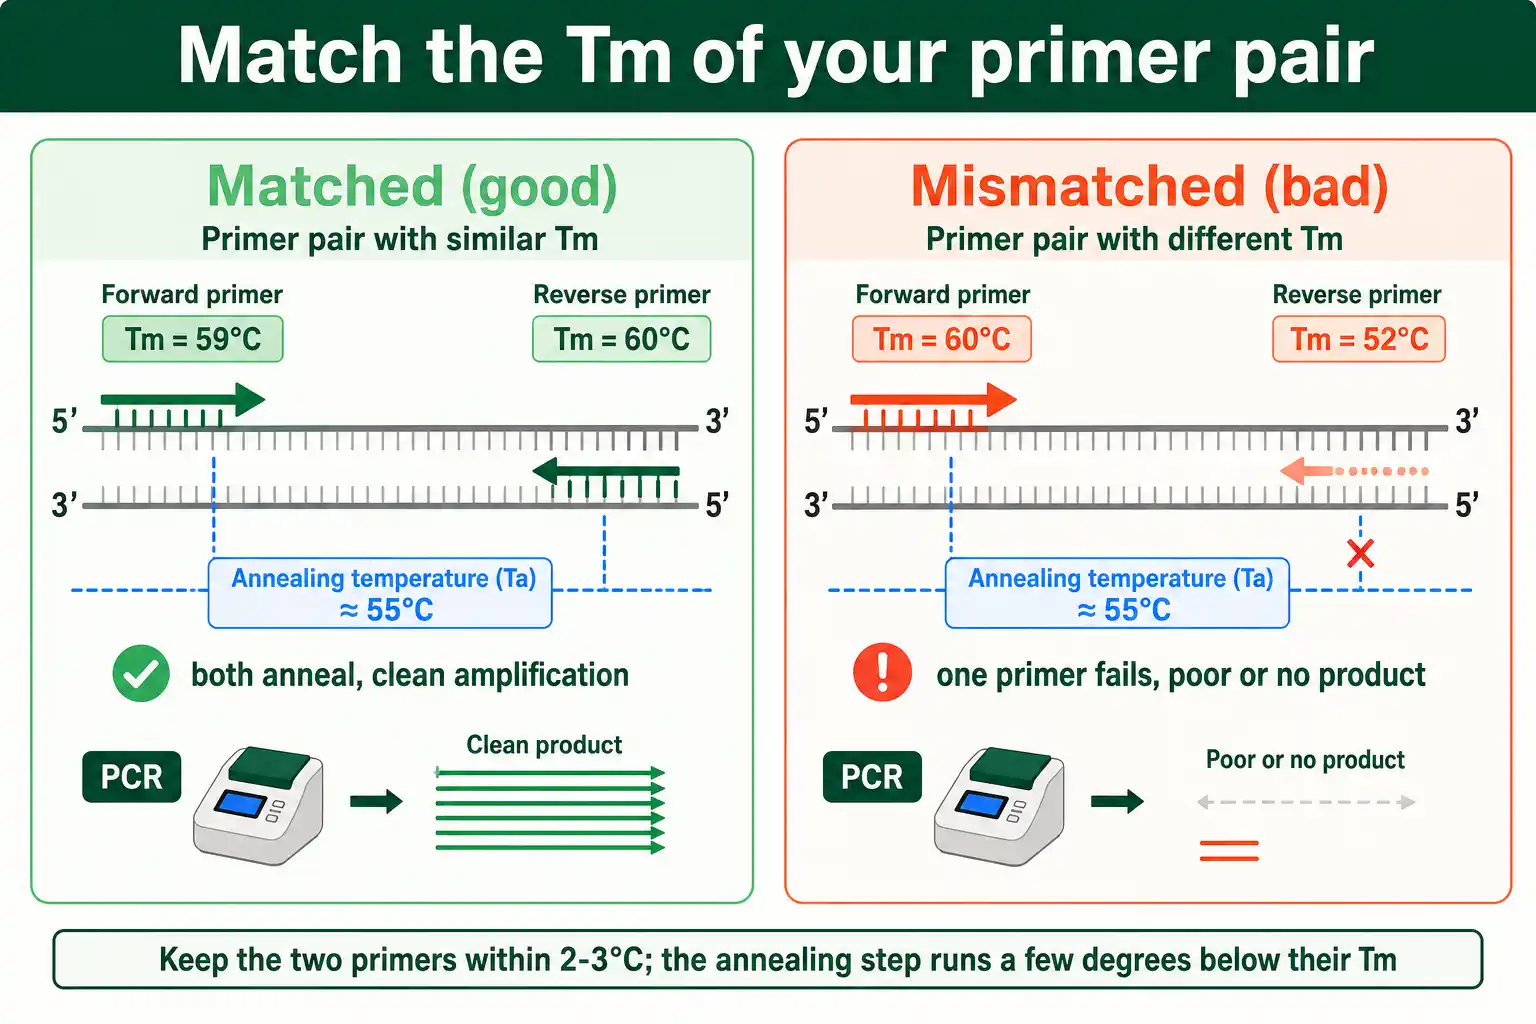
Target a melting temperature in the mid-50s to low-60s Celsius, and match the two primers of a pair to within about 2 to 3 degrees of each other. The match between the pair matters as much as the absolute value.
The annealing step of PCR runs a few degrees below the primers' Tm, typically 3 to 5 degrees lower, so both primers must anneal at the same temperature to work in the same reaction. If one primer has a Tm of 60 and the other 52, no single annealing temperature suits both: set it for one and the other fails. So design the pair together, adjusting length and sequence until their melting temperatures align. When in doubt about the right annealing temperature, a gradient PCR that tests a range of temperatures around the predicted value finds the optimum empirically.
The 3' End and the GC Clamp
The 3' end of a primer is the most important part, because that is where DNA polymerase begins extension. Two rules govern it.
First, the 3' end should be specific and stable, which is why a GC clamp helps: having one or two G or C bases among the last five bases at the 3' end strengthens binding exactly where extension starts. The stronger three-hydrogen-bond pairing of G-C anchors the business end of the primer. Second, do not overdo it. More than three G or C bases in the last five can make the 3' end bind too strongly at unintended sites, causing mispriming and nonspecific products. So the rule is a clamp of one or two G/C bases at the 3' end, not a run of them. As the Benchling primer-design guidance notes, a GC clamp of about two G or C bases in the last five positions promotes specific binding without overdoing it. A primer that ends in a stable, single-site 3' end is far more likely to amplify cleanly.

Avoid Secondary Structures
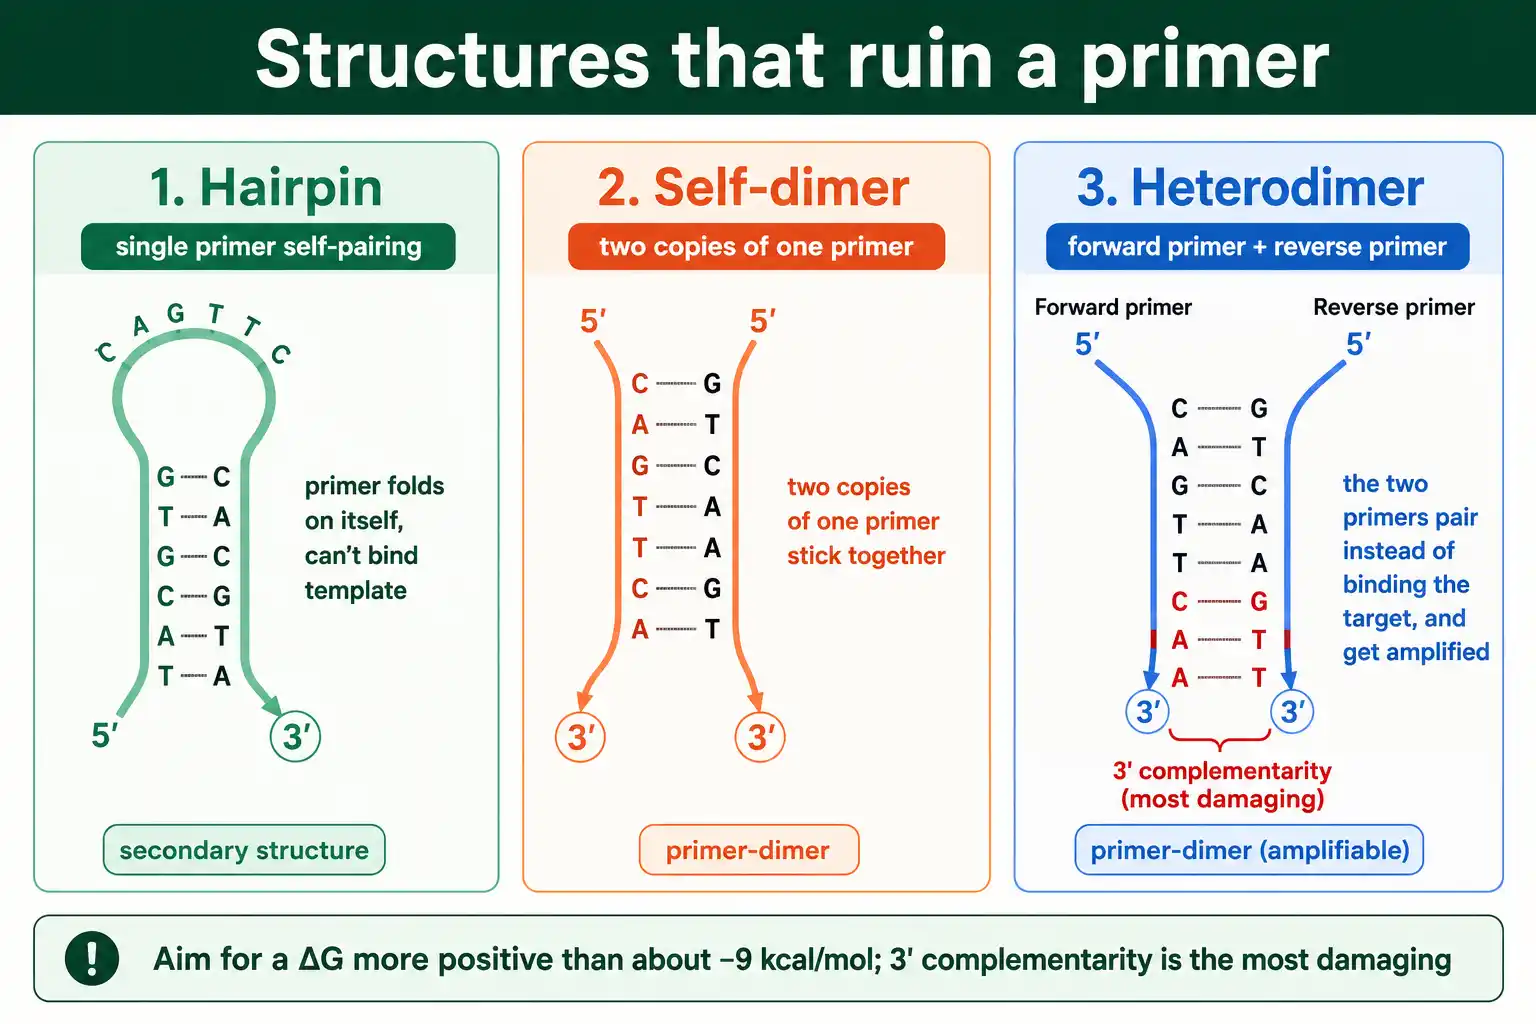
Primers that fold on themselves or stick to each other waste themselves and ruin reactions. Screening for secondary structures is an essential design step, and it is the one most worth automating.
Three structures cause trouble. A hairpin forms when a primer folds back and pairs with itself, tying up the primer so it cannot bind the template. A self-dimer forms when two copies of the same primer pair with each other. A heterodimer forms when the forward and reverse primers pair with each other instead of the template, which is especially damaging when the pairing involves the 3' ends, because the polymerase will extend the dimer and amplify it instead of the target. All three reduce the primer available for real amplification.
The way to catch these is to compute the binding energy of any potential structure. A structure is only a problem if it is stable enough to form, measured by its Gibbs free energy, ΔG. As a rule of thumb, the ΔG of any hairpin, self-dimer, or heterodimer should be weaker, meaning more positive, than about −9 kcal/mol; more negative than that and the structure forms readily. Checking this by hand is impractical, so use a tool: running the sequence through an oligo analyzer screens for hairpins, self-dimers, and heterodimers and reports the ΔG of each, which is exactly the check this step calls for.
Ensure Specificity
A primer must bind your target and nowhere else. Specificity failures produce extra bands and confusing results, so verifying it is a core design step.
Several rules support specificity. Avoid runs of the same base, since a stretch like four or more identical bases or a repeat like ATATAT promotes mispriming and slippage. Keep the 3' end unique, because the polymerase tolerates mismatches far from the 3' end but not near it, so a 3' end that matches an off-target site can prime there. Above all, check the primer against the whole genome or template you are working in. The standard tool for this is Primer-BLAST from the NCBI, which designs primers and checks them against a chosen genome to confirm they hit one place. Designing the reverse primer also means working with the reverse complement of the target, which our reverse complement tool generates in one step.
Adding 5' Tails
Sometimes a primer needs extra sequence at its 5' end that does not match the template, called a tail. This is a deliberate exception to the matching rules, and it is useful to understand.
A 5' tail adds functional sequence to the amplicon, such as a restriction enzyme site for cloning, an adapter for sequencing, or a tag. Because the 5' end of a primer is not where extension begins, it tolerates mismatches: the tail does not bind the template in the first cycle but gets incorporated into the product and matches in later cycles. When adding a restriction site, include a few extra bases beyond the cut site so the enzyme has room to bind the end of the amplicon. The key point is that only the 3' portion needs to match the template; the 5' end can carry added function. This flexibility is what makes primers such versatile tools.
Designing for the Amplicon
Beyond the primers themselves, the region they flank, the amplicon, has its own design considerations. Where you place the primers determines what gets amplified and how well.
Amplicon size matters. For standard PCR, products of roughly 100 to 1,000 base pairs amplify reliably, while very long products need specialized polymerases and conditions. For quantitative PCR, shorter amplicons of about 70 to 150 base pairs are preferred, because they amplify efficiently and reproducibly. So choose primer positions that give an amplicon of the right size for the method. Place the forward primer on the sense strand upstream of the target and the reverse primer on the antisense strand downstream, pointing toward each other, so polymerase extension from each runs across the region between them.
Primer placement also affects specificity at the experiment level. For amplifying a gene from genomic DNA, designing primers that span an intron, or sit in different exons, distinguishes the spliced messenger RNA product from contaminating genomic DNA, since the genomic version includes the intron and gives a larger or absent product. The Gene Commons guide to primer selection covers these placement strategies for PCR and sequencing. The lesson is that good primers are necessary but not sufficient; where you put them shapes the result as much as their individual quality.
Common Primer Design Mistakes
A few mistakes account for most primer failures. Knowing them turns the guidelines into instincts.
The first is a mismatched Tm between the pair. Designing each primer in isolation often leaves them several degrees apart, so no annealing temperature suits both. Design the pair together and check the match. The second is ignoring secondary structure, especially 3' complementarity between the two primers, which produces primer-dimers that amplify instead of the target and show up as a small, bright band. The third is skipping the specificity check, trusting that a primer is unique without confirming it against the genome, which invites extra bands from off-target sites.
The fourth is a 3' end problem: either a weak 3' end that primes poorly, or a 3' end that matches an off-target site and primes there. The fifth is a long run of one base or a simple repeat, which causes slippage and mispriming. Every one of these is catchable before ordering, which is the whole point of running the checklist and screening tools before committing to synthesis. A few minutes of design review is far cheaper than a failed experiment and a reorder.
The Primer Design Checklist
The guidelines come together as a checklist you can run on any candidate primer pair. The table collects them.
| Parameter | Target |
|---|---|
| Length | 18 to 25 bases |
| GC content | 40 to 60 percent |
| Melting temperature | Mid-50s to low-60s °C |
| Tm match (pair) | Within 2 to 3 °C |
| 3' end | 1 to 2 G/C in last 5 bases (GC clamp), not more than 3 |
| Base runs | Avoid 4+ identical bases or long repeats |
| Secondary structure | Hairpin/dimer ΔG more positive than about −9 kcal/mol |
| Specificity | One binding site, confirmed against the genome |
Running this checklist catches most primer problems before they cost a failed reaction. The parameters are not independent: hit the length and GC targets and the melting temperature usually falls into place, so the list is faster to apply than it looks. For anything important, the secondary-structure and specificity checks are the two that most reward using a tool rather than eyeballing.
Frequently Asked Questions
What makes a good PCR primer?
A good PCR primer is 18 to 25 bases long, has 40 to 60 percent GC content, a melting temperature in the mid-50s to low-60s Celsius matched to its partner within a few degrees, and a G or C among the last few bases at the 3' end. It should not form hairpins or dimers, should avoid long base runs, and should bind only its intended target.
Why does the 3' end of a primer matter most?
Because DNA polymerase begins extension at the 3' end, so that is where binding must be accurate. A mismatch near the 3' end stops extension or causes mispriming at off-target sites, while a mismatch at the 5' end is tolerated. This is why a GC clamp stabilizes the 3' end, and why the 3' end must be unique to the target.
How do I avoid primer dimers?
Screen the primer pair for complementarity, especially at the 3' ends, using a tool that reports the binding energy of any self-dimer or heterodimer. Aim for a ΔG more positive than about −9 kcal/mol. Avoid primers whose 3' ends are complementary to each other or to themselves, since those pair up and get amplified instead of the target.
Designing Primers That Work
PCR primer design comes down to a handful of rules that all serve one goal: a primer that binds its target cleanly and lets the polymerase extend. Keep primers 18 to 25 bases, 40 to 60 percent GC, with matched melting temperatures and a modest GC clamp at the 3' end. Then screen out hairpins and dimers, confirm the primer binds only its target, and add any 5' tail your application needs.
Most of these rules interlock, so meeting the length and GC targets carries the melting temperature along with it, and the checklist becomes quick to run. The two checks worth automating are secondary structure and specificity, where a tool sees what the eye misses. The secondary-structure problem is important enough to treat on its own, which our guide on oligo secondary structure covers in detail.